


Discover the Power of the Pi Pico 2: Your Ultimate Guide to Getting Started

The Raspberry Pi Pico 2 is a game-changer in the world of microcontrollers. It offers a blend of power and versatility. This makes it perfect for both beginners and seasoned hobbyists.
With its dual-core ARM Cortex-M0+ processor, the Pico 2 delivers impressive performance. It’s designed for low power use, ideal for battery-powered projects. This ensures your creations can run longer without frequent recharges.
Wireless connectivity is a standout feature of the Pico 2. It supports both Wi-Fi and Bluetooth, expanding your project possibilities. This opens doors to innovative Internet of Things (IoT) applications.
The board’s GPIO pin configuration is comprehensive. It allows for extensive customization and expansion. This makes it a favorite for breadboard projects and prototyping.
Whether you’re into robotics, home automation, or wearable tech, the Pico 2 has you covered. Its small form factor and powerful features make it a must-have. Dive into the world of Raspberry Pi Pico 2 and unleash your creativity.
Overview of Raspberry Pi Pico 2
What is the Raspberry Pi Pico 2?
The Raspberry Pi Pico 2 is a powerful microcontroller development board. It builds on the success of the original Raspberry Pi Pico. Users love its versatility and performance.
Designed with a dual-core ARM Cortex-M0+ processor, it handles complex tasks effortlessly. The board’s low power consumption attracts developers and hobbyists alike. It ensures efficient energy use in projects.
The Pico 2 is perfect for a wide array of applications. From simple DIY projects to advanced embedded systems, it shines. Here’s why it stands out:
- High-performance microcontroller for demanding tasks
- Extensive GPIO pin configuration for connectivity
- Equipped with wireless capabilities for innovative projects
These features make the Raspberry Pi Pico 2 a popular choice among electronics enthusiasts. Its seamless integration into projects broadens its appeal. Users appreciate the board’s robustness and ease of use.
Key Features
The Raspberry Pi Pico 2 boasts several compelling features. It’s designed to cater to both new and advanced users. Its dual-core processor ensures enhanced processing speed.
Wireless connectivity via Wi-Fi and Bluetooth is a major highlight. This allows for real-time control and monitoring. It fosters diverse IoT application development.
Another key aspect is the GPIO pin setup. It supports multiple peripherals and interfaces. This makes circuit design more flexible and manageable.
- Fast dual-core ARM Cortex-M0+ processor
- Comprehensive GPIO pinout for versatile connections
- Supports wireless communication through Wi-Fi and Bluetooth
The board’s compact size allows for easy integration into projects. It is particularly useful in portable and space-constrained applications. These features make the Raspberry Pi Pico 2 indispensable in modern electronics projects.
Technical Specifications
Raspberry Pi Pico 2 Specs
The Raspberry Pi Pico 2 brings impressive specifications to the table, making it a versatile choice for various projects. It features a dual-core ARM Cortex-M0+ processor, providing robust performance. This processor is ideal for handling multiple real-time tasks.
Its memory capabilities are also noteworthy, with 264KB of SRAM and 2MB of onboard flash memory. This ensures ample space for code and data. The low power consumption design is another strong point. It extends the battery life in portable projects, enhancing efficiency.
Key specifications include:
- Dual-core ARM Cortex-M0+ processor
- 264KB SRAM, 2MB onboard Flash memory
- Low power consumption design
These specifications show the board’s adaptability. The Raspberry Pi Pico 2 is suited for tasks ranging from simple automation to complex computing needs. Its capabilities meet the demands of both beginners and seasoned developers, making it a reliable development platform.
Raspberry Pi Pico 2 W Specs
The Raspberry Pi Pico 2 W enhances its predecessor with advanced wireless functionality. This model supports Wi-Fi and Bluetooth, enabling seamless connectivity in projects. Its dual-core processor remains consistent, ensuring reliable performance.
The board is equipped with the same 264KB of SRAM and 2MB of flash memory. These memory specs support a range of applications effectively. The enhanced wireless capabilities make it particularly appealing for IoT and remote-monitoring applications.
Additional specifications include:
- Wi-Fi and Bluetooth connectivity
- Dual-core ARM Cortex-M0+ processor
- 264KB SRAM, 2MB Flash memory
These specs highlight the Pico 2 W’s suitability for networked applications. The wireless features offer great flexibility, aiding in developing smart and connected devices. Its comprehensive specs help users implement innovative projects with ease.
Pinout Diagrams
Understanding the pinout is crucial for Raspberry Pi Pico 2 projects. Pinout diagrams illustrate the board’s layout, aiding in effective peripheral connection. These diagrams ensure correct and efficient circuit designs.
The diagrams provide a visual guide to the GPIO pins and other interfaces. They highlight important pin functions and connectivity options. Such clarity is essential for users when planning their electronics setups.
Raspberry Pi Pico 2 Pinout
The Raspberry Pi Pico 2 offers a versatile pinout layout. Its GPIO pins facilitate numerous connections, supporting vast project applications. The board includes 26 multi-function GPIO pins.
These pins support various interfaces, like UART, SPI, and I2C. This flexibility allows seamless integration of sensors and peripherals. Users can design custom circuits based on project needs.
Key GPIO pin functions include:
- 26 multi-function GPIO pins
- Support for UART, SPI, and I2C interfaces
- Flexible configuration for project customization
This pinout flexibility fosters creativity in project design. Whether simple or complex, your project’s connectivity needs are covered. The Raspberry Pi Pico 2’s pinout is both efficient and user-friendly.
Raspberry Pi Pico 2 W Pinout
The Raspberry Pi Pico 2 W pinout further expands connectivity options. It retains the original’s GPIO configuration, with added wireless functionality. This enhances its suitability for a range of advanced applications.
The additional wireless capabilities complement the existing GPIO functions. This combination facilitates diverse communication protocols. It is ideal for developing IoT and smart device projects.
Highlights of the Pico 2 W pinout:
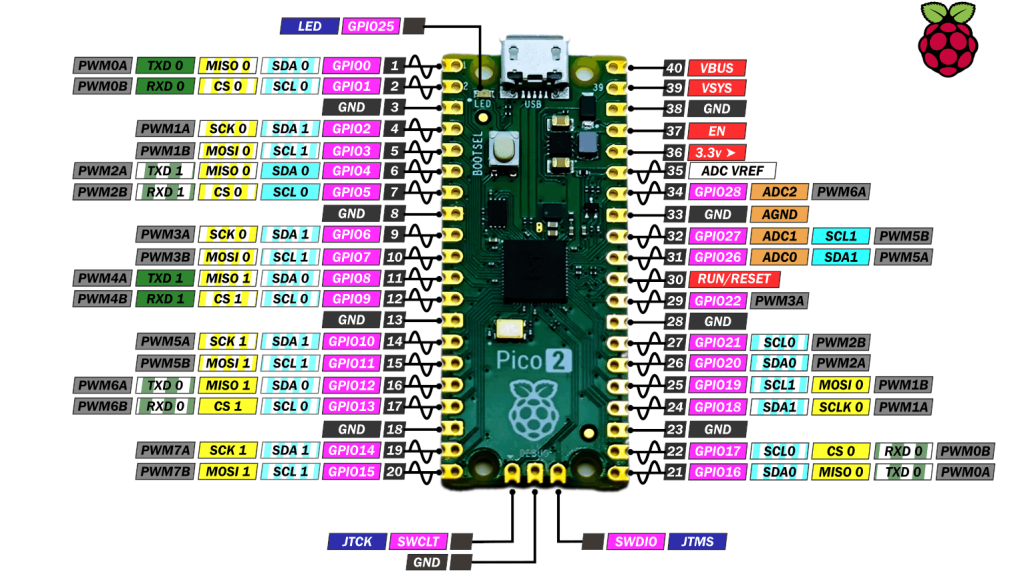
- Standard GPIO layout with wireless enhancements
- Continued support for UART, SPI, and I2C interfaces
- Ideal for advanced, connected projects
The Raspberry Pi Pico 2 W’s pinout accommodates evolving technological needs. Users benefit from its enhanced flexibility, making it an excellent choice for modern electronics and smart applications.
Getting Started with Pi Pico 2
Setup Requirements
Before you dive into Raspberry Pi Pico 2 projects, a few key items are necessary. First, ensure you have a compatible USB cable to connect the Pico to your computer. You’ll also need software tools like MicroPython or C/C++ IDE for coding.
Additionally, a soldering iron might be essential if you’re using headers. Consider a breadboard for prototyping circuits. A power source, usually from the computer’s USB, is also crucial.
Here’s what you’ll need:
- USB cable (Micro USB type)
- MicroPython or C/C++ environment
- Breadboard and jumper wires
- Power source (via USB)
With these components, you’re prepared to start your first project. Setting up the environment and tools ensures a smooth building experience.
First Steps: Booting Your Pico
Booting your Raspberry Pi Pico 2 is a straightforward process that initializes your project journey. Start by connecting the Pico to your computer via the USB cable. Upon connection, hold the BOOTSEL button, then plug in the USB.
The computer should detect the Pico as a mass storage device. Now, you can upload firmware like MicroPython to start coding. Using the drag-and-drop method, simply place the UF2 file onto the Pico.
Steps to boot the Pico:
- Hold the BOOTSEL button on the Pico.
- Connect the USB cable to the computer.
- Drag and drop the UF2 firmware file.
This method sets up your Pico for further software interaction. Once booted, you’re ready to explore its capabilities and start creating.
Projects and Applications
Breadboard Projects
The Raspberry Pi Pico 2 is perfect for breadboard projects due to its compact form. You can easily experiment with a multitude of circuits by plugging it into a breadboard. This setup allows for quick changes and testing.
Simple projects like blinking LEDs or sound devices are great starting points. As you grow in confidence, you can move to more advanced tasks. The flexible GPIO pin configuration supports diverse components.
Here are a few project ideas:
- LED blinking sequences
- Basic sound synthesizer
- Temperature measurement with sensors
Breadboarding with the Pico offers hands-on learning. This approach fosters creativity in electronics development.
Low Power Microcontroller Applications
The Pi Pico 2 shines in low power applications, making it ideal for battery-powered devices. Its efficient power consumption extends the life of portable gadgets significantly. You can develop energy-conscious projects without sacrificing performance.
Examples include environmental sensors or portable monitoring devices. These projects benefit from the Pico’s ability to operate with minimal energy. Even wearable technology can incorporate the Pico with ease.
Consider the following applications:
- Portable environmental monitors
- Low-power wearables
- Energy-efficient IoT devices
Such projects make the most of its low power capabilities. This results in longer battery life and sustainable tech solutions.
Real-time Applications
Real-time applications are a forte of the Raspberry Pi Pico 2. Its fast processing allows for time-sensitive tasks in numerous fields. You can develop systems that require immediate feedback and rapid data handling.
These applications might include automated control systems or interactive robotics. The dual-core processor ensures that time-critical operations run smoothly. Such capabilities are pivotal in responsive project implementations.
Potential real-time uses include:
- Interactive robot control
- Time-sensitive sensor data analysis
- Automated real-world response systems
Engaging in real-time projects enhances problem-solving skills. It also showcases the Pico’s robust processing power in practical scenarios.
Raspberry Pi Pico 2 vs Arduino
Comparing the Raspberry Pi Pico 2 with Arduino reveals distinct advantages. The Pico offers more advanced connectivity options, including wireless features. It’s a suitable choice for projects demanding high processing speed.
Arduino, on the other hand, is renowned for simplicity and a strong community. This makes it excellent for beginners exploring basic electronics. The choice ultimately depends on project requirements and personal preference.
Consider these differences:
- Advanced processing in Pico
- Greater wireless options in Pico
- Simple interface with Arduino
Weighing these points helps in selecting the right board. They both cater to different needs in hobbyist and professional projects.
Embedded Systems Applications
Raspberry Pi Pico 2 excels in embedded systems applications. Its compact design and powerful core make it ideal for integrating into existing setups. From automated systems to custom electronic devices, the Pico is versatile.
Use cases include home automation systems and smart devices. The Pico supports enhancements to numerous gadgets through embedded capabilities. The board’s design accommodates various systems efficiently.
Examples of embedded uses:
- Home automation controls
- Smart electronic devices
- Integrated automation systems
These applications leverage the Pico’s strengths in embedded environments. Developing such systems can revolutionize daily device interaction.
Advanced Topics
GPIO Pin Configuration
The GPIO pin configuration on the Raspberry Pi Pico 2 is remarkably versatile. This feature allows users to customize connections for a wide variety of projects. Each pin can be assigned different functions, such as input, output, or peripheral connections.
Utilizing this flexibility, you can connect sensors, motors, or displays. With careful planning, the Pico’s GPIO can handle complex circuits easily. The configuration greatly enhances the scope of potential projects.
Key benefits of GPIO pins include:
- Versatile input/output options
- Support for multiple peripherals
- Easy to integrate with external components
Leveraging GPIO capabilities expands your project’s potential. Understanding these configurations can lead to more sophisticated designs.
ADC Capabilities
The Raspberry Pi Pico 2 boasts impressive ADC capabilities. This feature facilitates precise analog-to-digital conversion, supporting high-resolution data. It enables effective collection of analog signals from various sensors.
With its ADC, you can monitor environmental factors like temperature and light. This aids in creating accurate, data-driven projects. Such precision ensures projects can analyze inputs with greater reliability.
ADC uses and features include:
- High-resolution analog signals
- Supports diverse sensor types
- Accurate data acquisition
Exploiting these capabilities enhances project accuracy and functionality. Utilizing the ADC opens new possibilities for sensory applications.
Wireless Connectivity Options
The wireless connectivity options on the Pi Pico 2 W are a game-changer. Including Wi-Fi and Bluetooth, these options facilitate modern IoT solutions. They empower users to develop remote-controlled and networked applications.
Wireless features support seamless integration with smart home systems. This connectivity expands the reach and interactivity of projects. Users can control devices or collect data from afar effortlessly.
Connectivity opportunities include:
- Remote device management
- Networked data collection
- Integration with IoT ecosystems
The onboard wireless options greatly enhance project versatility. This connectivity paves the way for innovative, interactive electronics projects.
Conclusion
The Pi Pico 2 is an impressive microcontroller development board that appeals to both beginners and experts. Its robust features, including advanced GPIO configurations and reliable ADC capabilities, provide immense flexibility for a variety of projects.
Wireless connectivity expands what you can create, supporting complex applications with ease. Whether tackling hobby projects, educational endeavors, or professional systems, the Pico 2 delivers. Embracing this board opens doors to innovative and powerful project development opportunities. It’s a crucial tool for anyone passionate about electronics and programming.
